

How to install a watertight roof valley with shingles – three + one methods
Roof Valley - How to install it watertight with shingles?
A roof valley is formed where two sloping roof areas intersect to create an internal roof channel that drains run-off water from higher roof sections. The valley is one of the most critical details on the roof because it collects a lot of water. An improper installed valley can be the cause of serious leaks.
Essentially, there are three main ways to shingle a roof valley: woven, closed-cut and open. There are various techniques you’ll need to know for each type of installation, which will be explained in this blog. Before you decide how to shingle a roof valley, you will need to consider your materials, the climate and the desired look of the roof.
The three methods to shingle a roof valley
Preparation of the valley with an underlayment is a critical part of your roof installation. The underlayment is an integral part of every valley and provides a waterproof base. All valley installations require appropriate underlayment layers. We recommend using our IKO Armourbase range of underlays, which are very durable polyester membranes on bituminous base. Valley underlayment sheets should be centered in the valley and secured with only enough fasteners to hold them in place until the primary valley installation is complete. Self-adhesive IKO Armourbase Stick underlayment may not require too much fastening. The underlayment material from the two adjacent roof planes should overlap the valley base sheet by at least 15 cm. Also all the fasteners should be kept a minimum of 15 cm from the valley's center line.
1. Woven Valley Shingle Installation
To achieve a woven valley installation, a roofing professional lays shingles in the valley and weaves them together. Some homeowners prefer the consistent look that a woven valley provides. But if the shingles are not laid properly in the valley, a woven valley may not lay flat, creating bumps and detracting from the overall look of the roof. With this method it is not necessary using bituminous mastic in the valley. However it is very important to push the shingles snugly into the valley, while not nailing within 15 cm of the valley center. If this is not done properly, hollow space may develop under the shingles. The empty space makes the shingles vulnerable to penetration, either by footsteps, hail or other debris.

Woven valleys are suitable for 3-tab shingles or low-profile shingles
as their single layer construction allows them to be woven together and to be overlapped more easily. When considering how to shingle a valley with architectural shingles (Cambridge Xpress and Cambridge Xtreme), you must take into account their thickness and reduced flexibility. Laminated shingles are more liable to create bumps in woven valleys. Often they are too thick to be woven at all. Therefor IKO does not recommend installing a woven valley with laminated shingles.
2. Closed-Cut Shingle Valley Installation
Closed-cut valleys are installed quickly and have a cleaner, sharper look than woven valleys. From the ground, it looks as the shingles meet in a clean line in the center of the valley. One layer of shingles actually crosses the valley beneath the other. For closed-cut valleys, shingles on one roof plane are installed through a valley and extended at least 30 cm into the intersecting plane. Shingles from the other side are run to the valley and cut along a line parallel to and 5 cm before the center line. Each end shingle strip should have the upper corner trimmed and set in a bead of roof mastic.

We recommend to start the installation with the shingles on the valley side with the lowest slope or shortest distance to the ridge. That way the larger amount of water from the steeper roof section or the bigger roof accumulates in the valley and does not flow under the shingles.


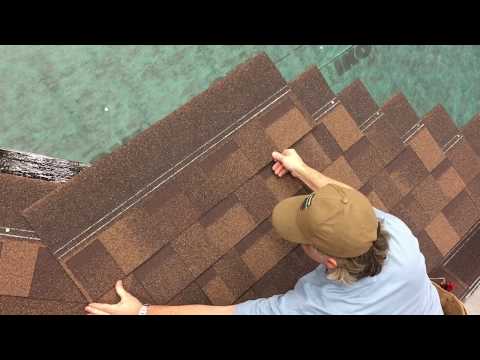
3. Open Valley Shingle Installation
An open valley relies on an Armourvalley membrane or metal flashing for protection. Armouvalley and metal flashing are left exposed, so these materials stay visible on the roof. Some homeowners do not like the look of metal (flashings) in the valley. Therefore we offer the Armourvalley roll which is matching the color of the shingles. Open valleys with laminated shingles have many advantages. One of the advantages is better drifting of water to the gutters, reducing the risk of ice dams or blockages of debris. Especially low slope roofs (9,5°- 20°) are good candidates for open valleys because they are more likely to accumulate debris. Experience learns that if the shingles are installed properly, performing properly, the open valley system holds up better over the time.

Quick guide how to install an open valley:
- Snap two chalk lines from the ridge to the eaves 8 cm apart increasing in width by 1 cm per meter towards the eaves.
- Trim the shingles to these lines and cut a 5 cm triangle off the top corner to direct the water into the valley.
- Nail the shingles 5 cm back from the chalk line.
- Do not use a shingle trimmed to less than 25 cm in length to finish a course running into a valley.
- If necessary, trim a part off the adjacent shingle in the course to allow a longer portion to be used.
- Glue the valley end of each shingle with bituminous mastic.
- There should be no exposed nails along the visible part of Armourvalley.


4. Our most favorite method:
It is the easiest, most money and time effective method!
IKO tip & trick for the Cambridge shingles:
One variant of the open valley is the “Californian valley”. In our community it is also called “Cambridge valley” because this valley is only possible to do with laminated or Cambridge shingles. For this method, the last shingles on both “cut” sides of an open valley are actually installed sideways, so they run up and down the valley parallel with chalk-lines.
This saves the time of cutting shingles and is the fastest way to shingle a roof valley.
Remember:
A properly installed valley is a critical component of any roof, ensuring the long-term protection of this vulnerable area. IKO’s recommendation is to install laminated shingles, or architectural shingles, using the open valley method, for best roof performance.


